
Rhinoceros - Grasshopper - Keyshot | Workflow 5
Download Files : cademy.xyz/webinar5
Join our free webinar session to learn and create CAD model using Rhinoceros 3D, generate parametric texture with Grasshopper and create photorealistic renders using Keyshot.
Workflow Webinar : Herman Miller Chair
In this Workflow Webinar we will explore CAD modeling, parametric design and 3D rendering of the Herman Miller Verus Chair.
You can watch the entire Webinar with this Link or at the end of this post.

Herman Miller Verus Chair
The Herman Miller Verus chair is a highly ergonomic task chair designed to provide comfort and support for users in various work environments. It features a range of adjustable components and innovative engineering to promote healthy sitting postures and enhance productivity. The Verus chair incorporates ergonomic principles to ensure optimal support and comfort during long hours of sitting. It typically includes adjustable features such as seat height, seat depth, lumbar support, armrest height, and armrest width, allowing users to customize the chair according to their individual needs. Herman Miller's proprietary PostureFit technology may be integrated into the Verus chair. This feature provides targeted support to the lower back by promoting a healthy, neutral spine alignment and reducing the risk of back pain or discomfort. The chair is typically constructed with high-quality materials that offer breathability and comfort. This includes options for mesh backrests and seat fabrics that facilitate airflow, keeping the user cool and comfortable throughout the day.
So, at Cademy, we will learn how to CAD model this chair from scratch and create texture variations for the back support mesh/part.

Step 1
Create a side profile using the Project command and Loft the curves to generate the primary surface for the back support part of the chair. Rebuild the surface to obtain more control points. Add a couple of guiding curves to create the back profile.

Step 2
Use the BlendCrv command to connect the guiding curves using G0 and G1 continuity criteria. After creating the U and V curves, use NetworkSrf to create a surface from the input profiles.

Step 3
Draw the outer and Y-shaped cut-out profiles from the Front viewport, and Trim the outer part of the surface using the outer profile, and the back surface using the Y profile.

Step 4
Connect the Y cutout from the back part to the base support of the seating frame using the BlendSrf command. Add thickness by scaling the PolySurface and connect the two PolySurfaces with Loft.

Step 5
Create three profiles to make the chair cushion. Extrude the profiles, Rebuild them using Degree 2 surface and 3 control points, and add a negative crown to the three surfaces. Split the exterior surfaces and BlendSrf the three surfaces together using BlendSrf to create a solid polysurface.

Step 6
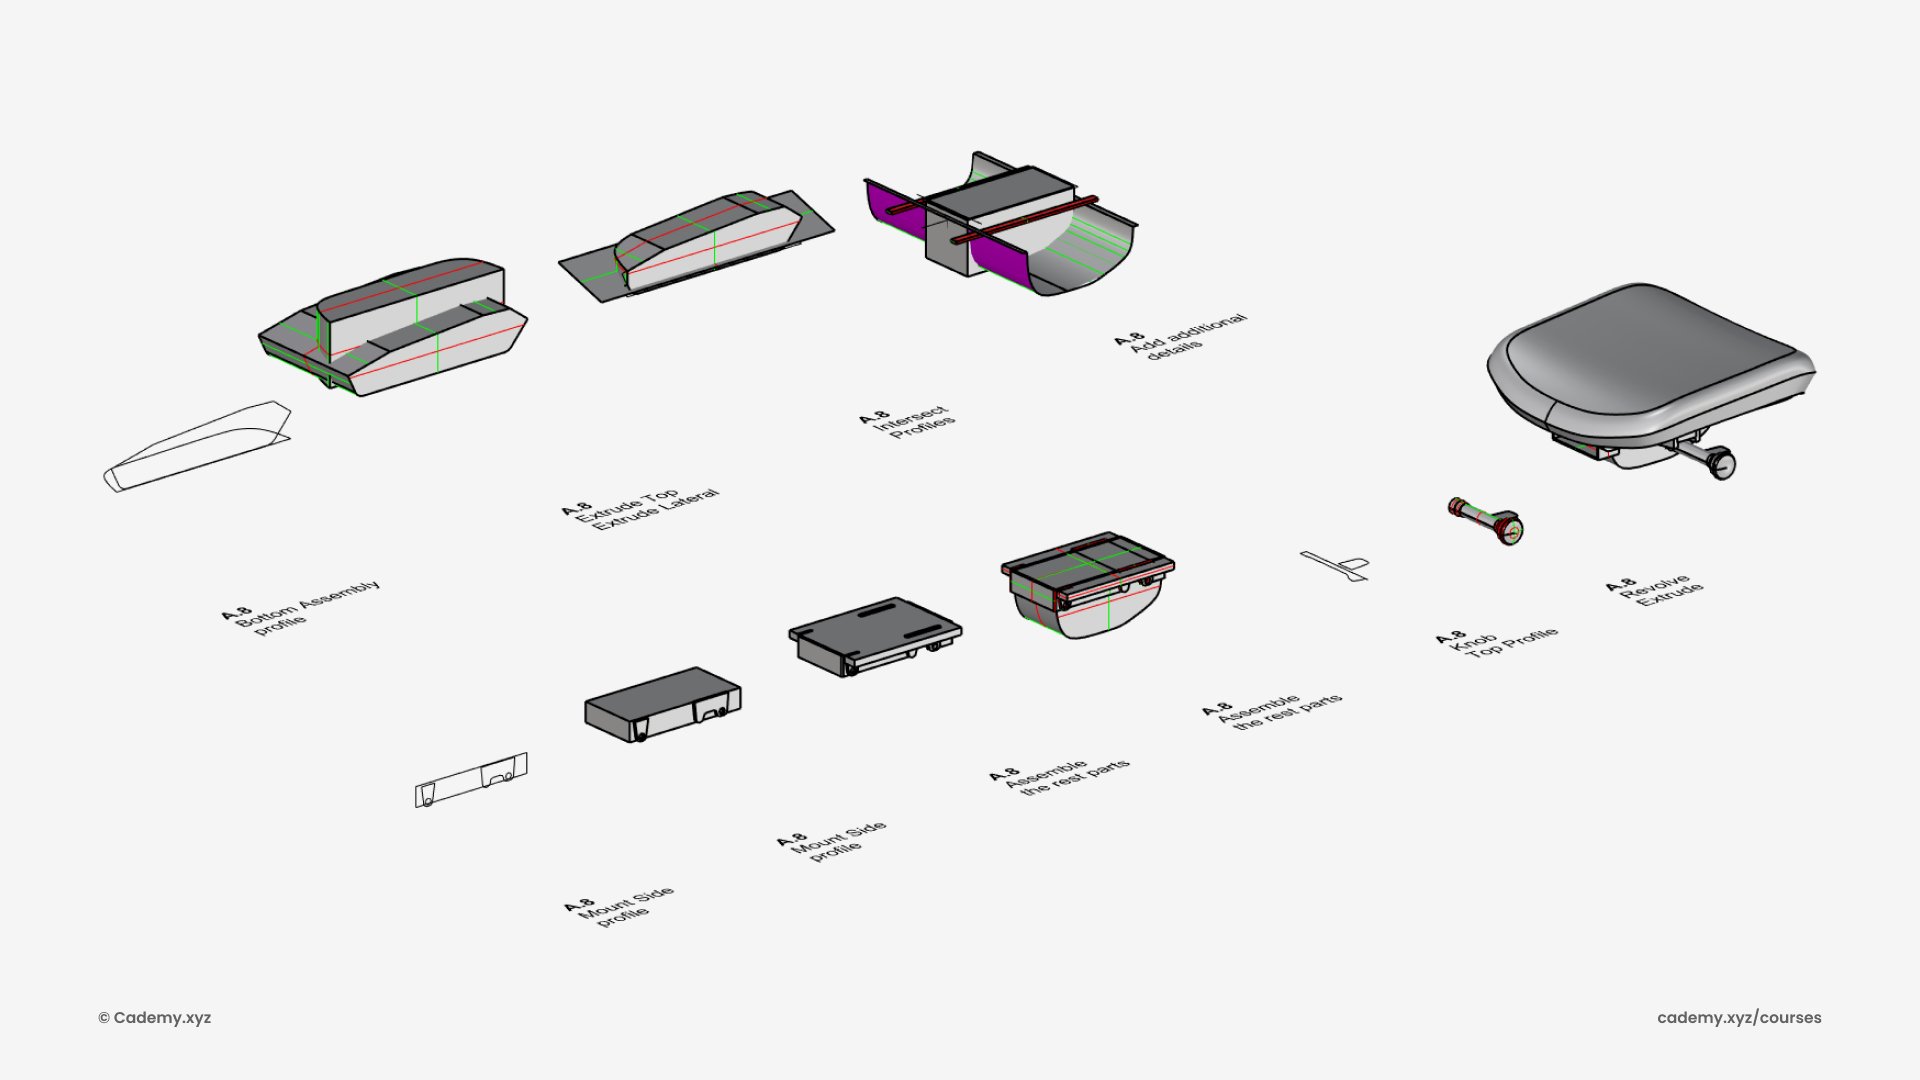
Extrude two profiles to create the mechanical assembly for height and angle adjustment of the chair. Perform a Boolean Intersection to create the solid components. Revolve the profile of the knob and position the entire assembly below the cushion.
Step 7
Create three profiles and Extrude them to project the top profile of the armrest. Split the excess surface and BlendSrf the three surfaces together. Apply a Fillet to smooth out the interaction between the two blends.

Step 8
The structure of the arm support is created using three extrusions and BlendSrf between the surfaces. The polysurface is capped and rotated by 35º to incline the structure.

Step 9
The wheel assembly is generated by creating a polar array with five copies of the top profile. Another surface is revolved, and the top profile is projected onto the surface. The rest of the surface is trimmed and extruded. Another revolved PolySurface cuts out the excess extrusion to create the support frames. The wheels are made with cylinders and revolved profiles.

Step 10
Finally, assemble all the parts into position.

Step 11
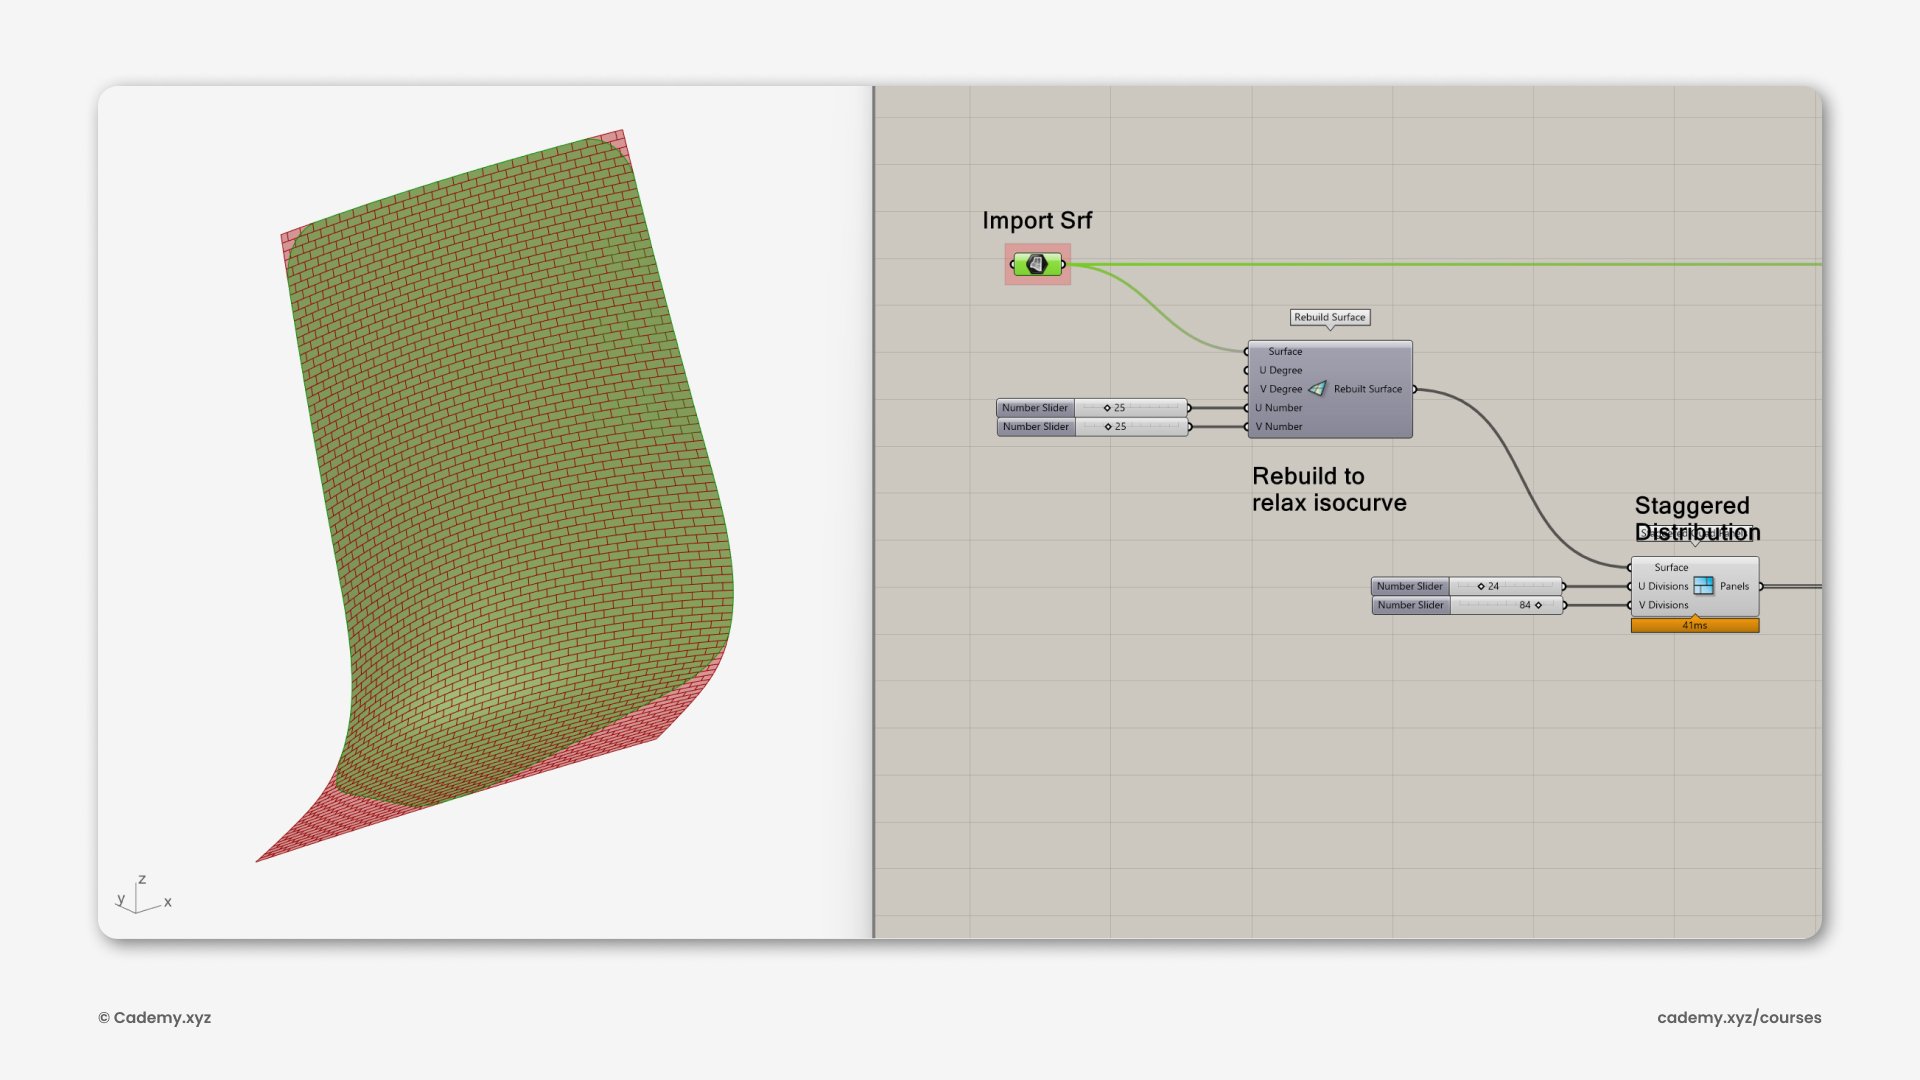
Extract the surface of the back support and reference it within Grasshopper 3D. Utilize the Lunchbox plugin to rebuild the surface in order to smoothen the surface isocurves. Integrate the staggered panel component to generate panels on the base surface.
Step 12
Extract the center and normal direction of each panel using the Evaluate Surface component. Make sure to Reparameterize the surface to standardize the domain parameter. Utilize an attractor geometry with the Pull Point command and Remap it to a range of 0 to 10.

Step 13
Using the Tween curve command, we can create a set of 10 curves between Profile A and Profile B. We will assign these 10 curves to all the frames. However, with the assistance of the values obtained from the attractor and remap component, we will only select one curve out of the 10 for each panel using List Item. The profiles that are closest to the attractor geometry will resemble Profile A, while the ones farther away from the attractor point will resemble Profile B. To create the perforation texture, we can extrude the profiles and perform a Boolean Difference operation in Rhino.

Step 14
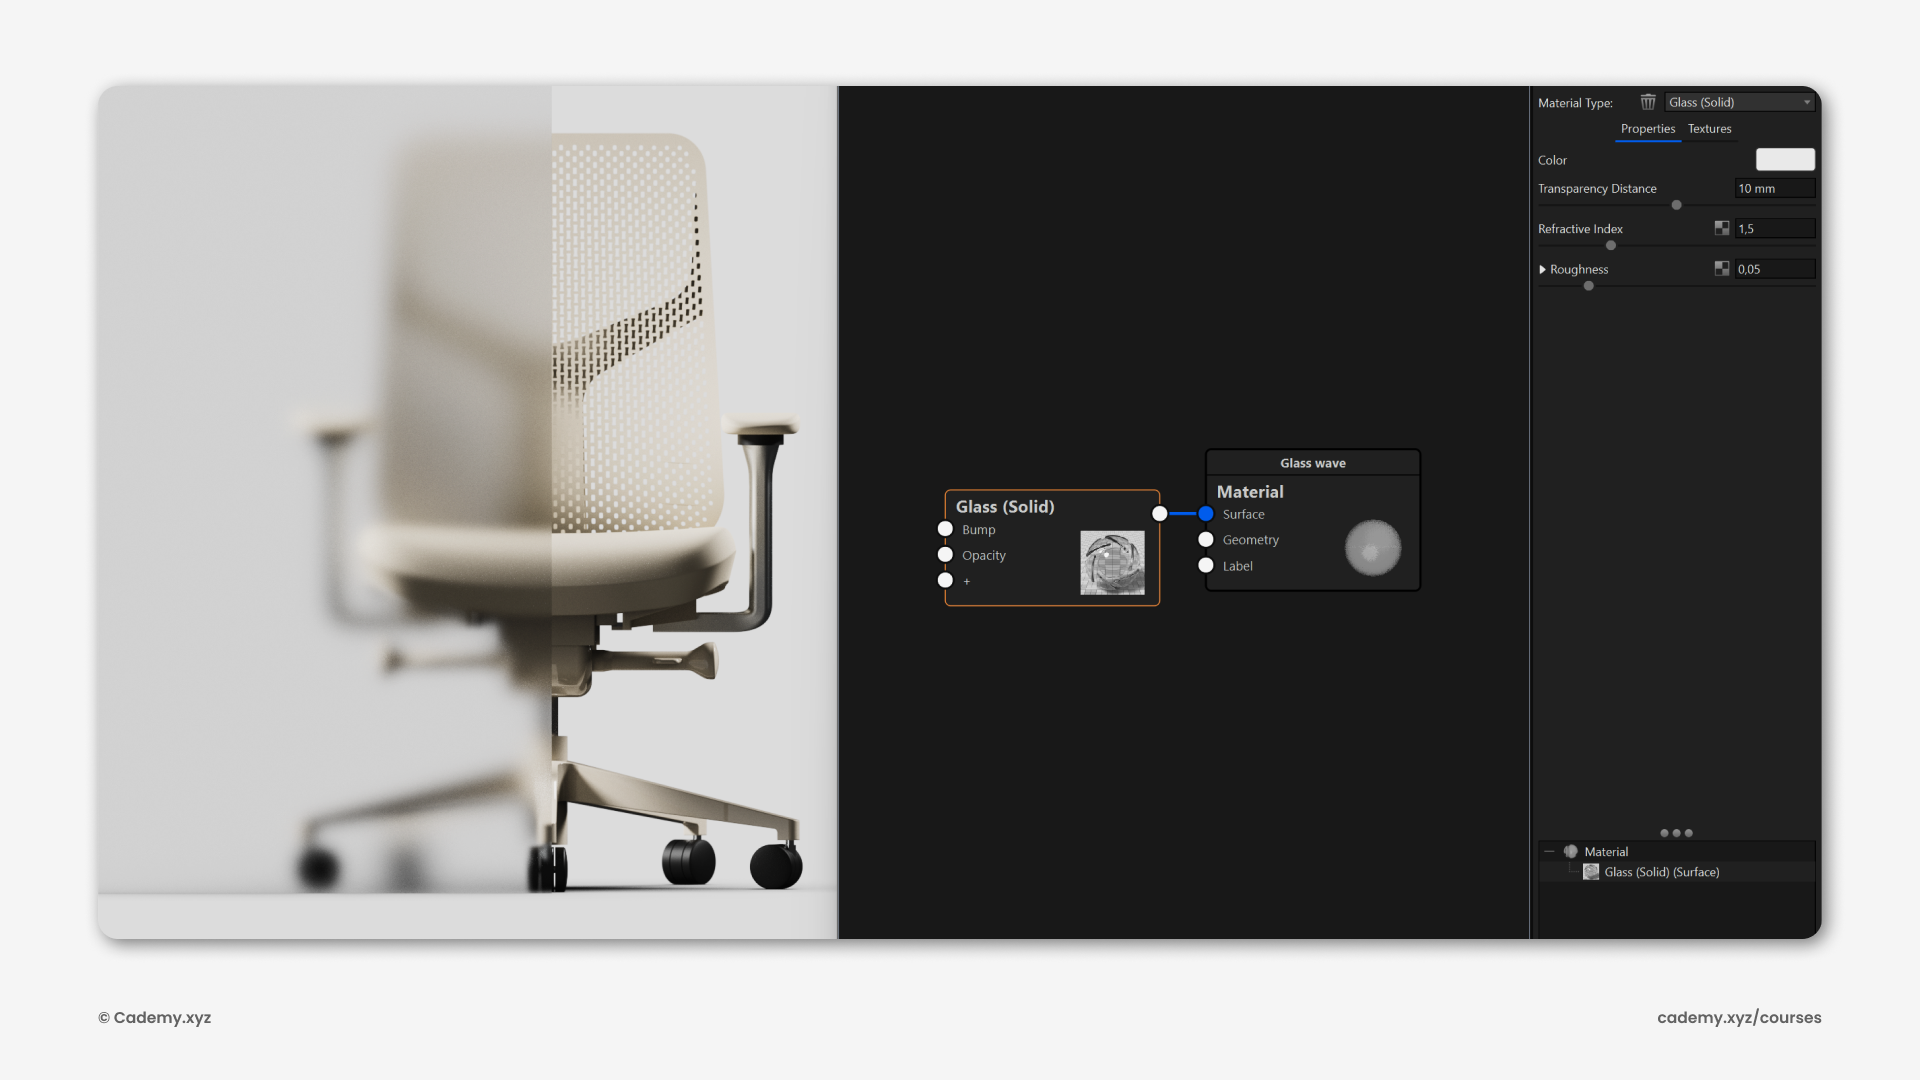
Let's open the .3dm file (Rhinoceros native file format) in Keyshot. Keyshot is rendering software used to create photorealistic product renders. Import the final model into Keyshot. Open the Material Graph of the solid wall extrusion. Add a Solid Glass material to the wall and change the color to 90% white. Also, add a slight roughness of 0.05 to create the effect of frosted glass.
Step 15
Use the Mesh procedural node to create vertical lines on the wall. Control the spacing and thickness of the mesh texture, and use the node as the Bump parameter for the Solid Glass material. Adjust the bump height to exaggerate the effect.

A. Software
Rhinoceros
Grasshopper 3D
Keyshot
ChituBox
B. 3D Printing
D.1 Export STL
D.2 SLA + FDM
THANK YOU <3
You can watch the complete webinar below and download the sample files from here. cademy.xyz/webinar5
Thank you for going through this post. If you are interested in learning Rhinoceros, Grasshopper 3D or Keyshot, you can check our LIVE classes here: cademy.xyz/courses ❤️